
![]() When items have been added to the menu, their properties – such as background colour, button width and height, font size and style – can be edited as required. This allows you to customise your layout to suit your needs, for example, you may want the items that are sold most commonly to have larger buttons and text than those that are sold less frequently.
When items have been added to the menu, their properties – such as background colour, button width and height, font size and style – can be edited as required. This allows you to customise your layout to suit your needs, for example, you may want the items that are sold most commonly to have larger buttons and text than those that are sold less frequently.
Editing the Properties of an Item

- Right click on an item on the layout and press Properties.
- This will display the items tile properties.
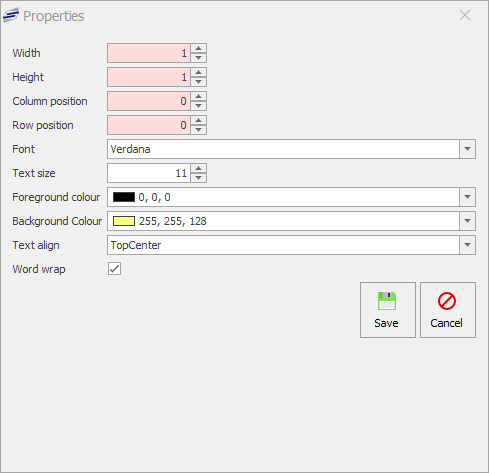
Width
You can change the width size of the tile by using the up or down arrows. This can be useful if you want to show a button that is more popular on the menu.

- Right click on the item and press Properties.
- Press the Up or down arrows to amend the values to the width.
- Press Save.
- The tile will change in size on the layout.
Height
You can change the height size of the tile by using the up or down arrows. This can be useful if you want to show a button that is more popular on the menu.
- Right click on the item and press Properties.
- Press the Up or down arrows to amend the values to the height.
- Press Save.
- The tile will change in size on the layout.
Column position
The tile will move to the column you select by using the up or down arrows. Alternatively you can drag the tile to your desired space on the layout.

- Right click on the item and press Properties.
- Press the Up or down arrows to amend the values to the column position.
- Press Save.
- The tile will move to the column selected.
Row position
The tile will move to the row you select by using the up or down arrows. Alternatively you can drag the tile to your desired space on the layout.

- Right click on the item and press Properties.
- Press the Up or down arrows to amend the values to the row position.
- Press Save.
- The tile will move to the row selected.
Font
Select a font from the drop down list you wish to use. Fonts can be useful if you want a particular item to stand out on the menu and to make certain items more attractive to readers.

- Right click on the item and press Properties.
- Press the down arrow for the font list.
- Select a font you wish to use.
- Press Save.
Text size
One reason larger sizes for text and other user interface elements is important is because it helps adjust the visual display to match the physical one, providing more comfort for users.

- Right click on the item and press Properties.
- Press the Up or down arrows to amend the values to the font size.
- Press Save.
- The size of the font on the tile will change.
Foreground colour
This is a key aspect to consider. It can be tempting to change font colours for effect, however it is important to consider the impact of this. For example, yellow text on a white background is particularly difficult to read and so a clear contrast such as black on white works well.

- Right click on the item and press Properties.
- Press on the down arrow to show the foreground colour palette drop-down.
- Select a colour.
- Press Save.
Background colour
You can change your items background colours to help set a tone, make certain areas stand out on the menu, or reinforce your products.

- Right click on the item and press Properties.
- Press on the down arrow to show the background colour palette drop-down.
- Select a colour.
- Press Save.
Text align
This option will move the text to a different location on the tile. It can be more pleasing on the eye to read the text from a different point of view.

- Right click on the item and press Properties.
- Press on the down arrow to show a list of text alignments.
- Select an alignment.
- Press Save.
Word wrap
Word wrap is a word processing feature that forces all text to be confined within defined margins. When a line of text is filled, the word processor automatically moves the text to the next line, so the user doesn’t have to press the return key after every line. This feature is active by default.

- Right click on the item and press Properties.
- Press the Word wrap tick box to make it active or inactive.
- Press Save.
Post your comment on this topic.